The WordPress editor is where most content is created on a page or post in WordPress. The tools of the WordPress editor assist in adding images, formatting text, and organizing your content. Knowing how to use the tools will allow you to think about your content more professionally, and provide more engaging content.
Toolbar Toggle for more tools
Look at all these additional tools! Using the Toolbar Toggle icon, you can expand an additional row of tools for the WordPress editor. This includes the ability to define text title tags, clear the formatting from your content, and so on. Don’t miss out on making the most of the WordPress editor, and be sure to have access to all the tools.

Becomes

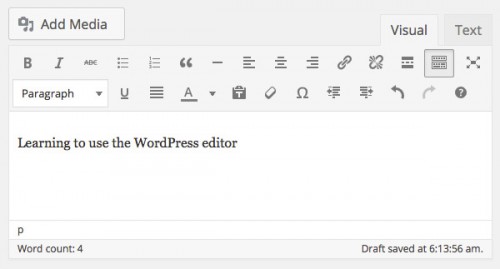
Visual to text tabs
You can switch between a visual editor and an html text editor by using the “Visual” and “Text” tabs in the top right of the WordPress editor. Switching to html can be helpful for adding shortcodes, or cleaning up strange formatting left from building the content (often present when pasting from Microsoft Word). But be careful! The text editor is sensitive to changes. Avoid altering the code in this area if you are not confident with your actions.

Skills to master
There are a few skills which are essential to learn, and that you will use all the time when creating content.
Link to pages
Setting up links in your content assists users navigate your website, and provides useful data for search engines. Make your site more engaging by linking keywords to relevant content.
Add a link by clicking the chain icon from the toolbar. A popup will appear, where you can provide the link information. Select an existing page from your website, or provide the URL to an external website.
Inserting images
Images can be added to any section of your content. Align images to the left, right, or center of the text.
![]()
Insert an image by clicking the Add Media button above the toolbar, to the top left. A popup will appear, where you can select an existing image, or upload a new one. Once you select an image, you can define the alignment, link URL, and other important image settings from the right side. Insert the image, and your image will be applied to the page.
Setup titles
Setting up titles correctly is essential for the organization of your content. Providing order to the content makes it easier to navigate, and it just looks better.
![]()
The text formatting tool is only accessible when you expand the toolbar. Using the Toolbar Toggle icon, expand the toolbar to reveal the text formatting tool dropdown. Highlight the text you would like to change, and update the text formatting.
Pro tip: Don’t change the styles
When it comes to styling text, some people try to use the tools provided in the WordPress editor. Although this might seem like the right choice, it is the wrong solution to text styles. Changing styles directly in the WordPress editor makes your website elements inconsistent, and hard to manage. Every page starts looking different from the rest, and constructing content takes more effort.
Instead, leave the styles in the stylesheets, and select a defined text format from the text formatting tool. Don’t change fonts, or colors from the WordPress editor. Those changes should be made in the stylesheet, which will be applied to all texts of that type. This way, a paragraph is already styled like a paragraph, and a title is already styled like a title. No additional styling is required if your stylesheets are properly set up. This will save you time and mental frustration. If you need assistance updating your stylesheets, let us know.