
There are a variety of ways to send form submissions on your WordPress website to Salesforce via a web to lead integration. But what if you want to go further, and build other connections between your WordPress website and your Salesforce data?
In the past, you would need to hire a specialist developer to build a custom system for you, connecting your website to Salesforce via their proprietary API. However, the Object Sync for Salesforce plugin simplifies a lot of this by creating a flexible system that allows you to build connections between WordPress metadata and Salesforce objects right in your WordPress dashboard. With this plugin, it’s entirely possible to sync specific data to, from, and/or between your website and Salesforce without writing a single line of code. And did we mention that it’s free?
Step 1: Authorize the Plugin
Once you’ve installed and activated the plugin on your website, you’ll need to log into Salesforce and create a new Application that will provide the authorization needed to send data back and forth. This can sound a little confusing, but it’s really easy. The plugin documentation provides detailed instructions on creating the application in Salesforce, selecting the correct settings, and then entering the appropriate fields into the plugin settings on your website to authorize the connection. You can find them under the “Salesforce” heading on this documentation page.
After successfully creating your Salesforce application and authorizing the connection, you can start building and mapping connections between your Salesforce objects and WordPress data. The first step is to navigate to the Fieldmaps tab in the Object Sync for Salesforce plugin settings. Click “Add New” to create a new connection, and on the following screen you’ll be asked to configure a few settings.
Step 2: Choose Your Salesforce and WordPress Objects
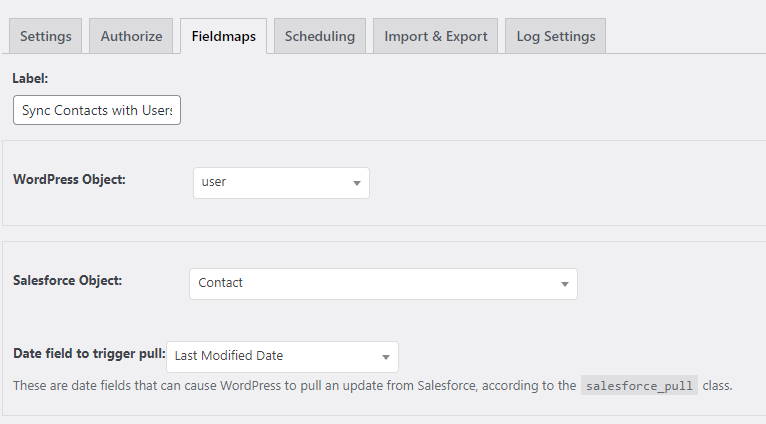
First, you’ll want to label your connection so that you’ll remember what it’s doing. Once you’ve entered a label, you’ll want to choose the WordPress object to connect to. This can be a post type, taxonomy, or user. If you’ve registered any custom post types or taxonomies, you will be able to connect to those as well, but you may need to ensure that you have at least one post or term set up before the option appears in the dropdown.
Once you’ve selected the WordPress object for the website side of the connection, you’ll want to select the corresponding Salesforce object to link to. Once you’ve selected both object types, the last thing to choose is which date field triggers Salesforce to send data to WordPress. You may want to trigger an update every time the a specific object is updated in Salesforce (choose “Last Modified Date”), or maybe even any time the specific object is viewed, regardless of updates (choose “Last Viewed Date”). Some Salesforce objects with their own date fields may have options for other date triggers as well.
In our example, we’re connecting the Salesforce Contacts table to our WordPress users, so that when new contacts are added in Salesforce, their data will be added to a WordPress user account.
Step 3: Connect Specific Fields Between WordPress and Salesforce
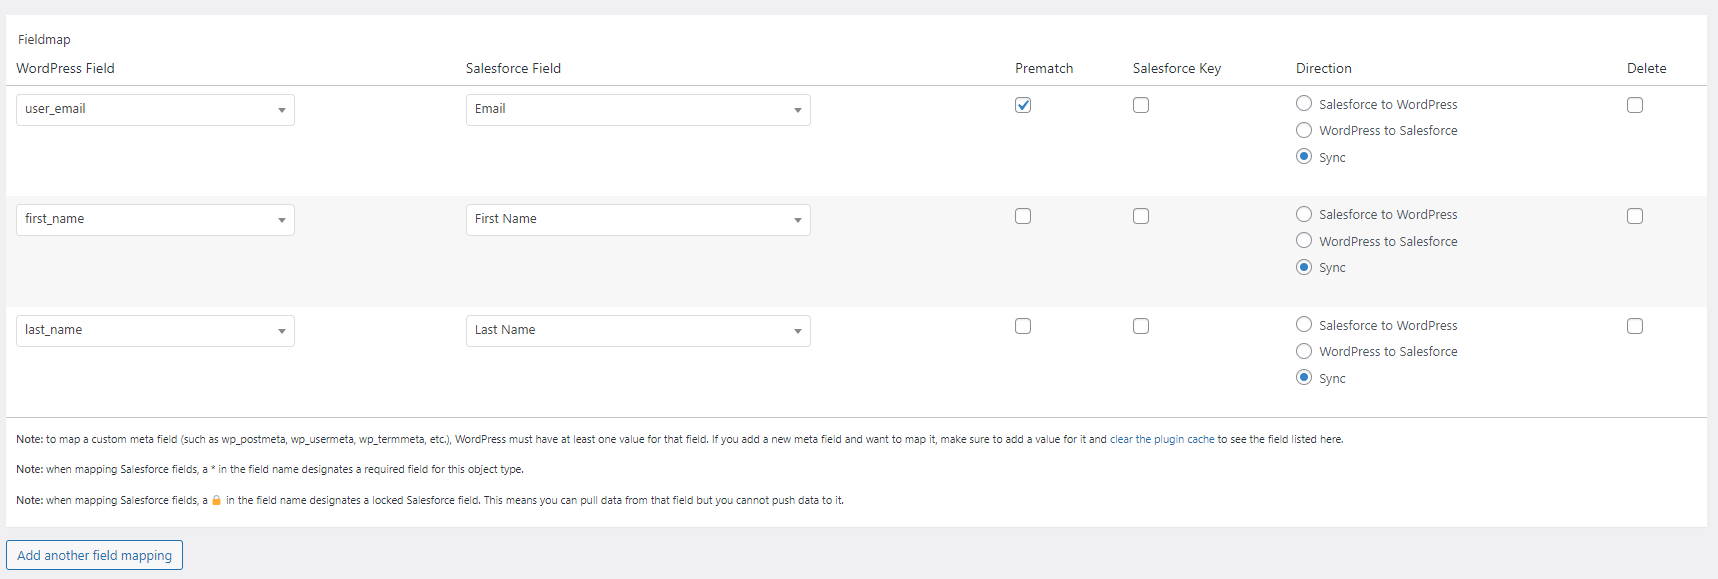
After you’ve finished with those settings, you can start connecting the individual fields on each side of the connection. Depending on the settings we’ll select later, you can either send field data from the website to Salesforce, from Salesforce to the website, or sync the fields so that if the data is modified on one side, it will be updated to match on the other.
To set up a new field map, click the “Add Field Mapping” button. You’ll notice that a new row is added to the table above the button.
In the new row, you can use the WordPress Field dropdown to select data from your WordPress object and then link it to a corresponding Salesforce data field using the Salesforce Field dropdown. The options for both dropdowns will be populated based on the WordPress and Salesforce Object selections you made earlier. If you’re trying to map a Salesforce field to a meta field on the WordPress side but aren’t seeing the meta key in the dropdown, make sure that at least one post has a value for that specific meta key. If there are no existing metadata entries, the plugin won’t be able to recognize it as a mappable field.
Once you’ve mapped your two fields, you can choose the Direction radio button that corresponds with how you want the data sent. The data can travel in a single direction (ie only from WordPress to Salesforce, or vice versa), or you can choose to sync the data, so that if one side of the connection is changed, the other side will be updated to match as well.
Repeat this process to add as many connections between fields as you’d like. Once you’ve set up all your field maps, you’ll want to choose a single field to check the “Prematch” checkbox. This will be the field that identifies existing versus new entries in your data. If a match is found for your “Prematch” field on either side, then the corresponding record will be updated. If no match is found, than a new record will be created.
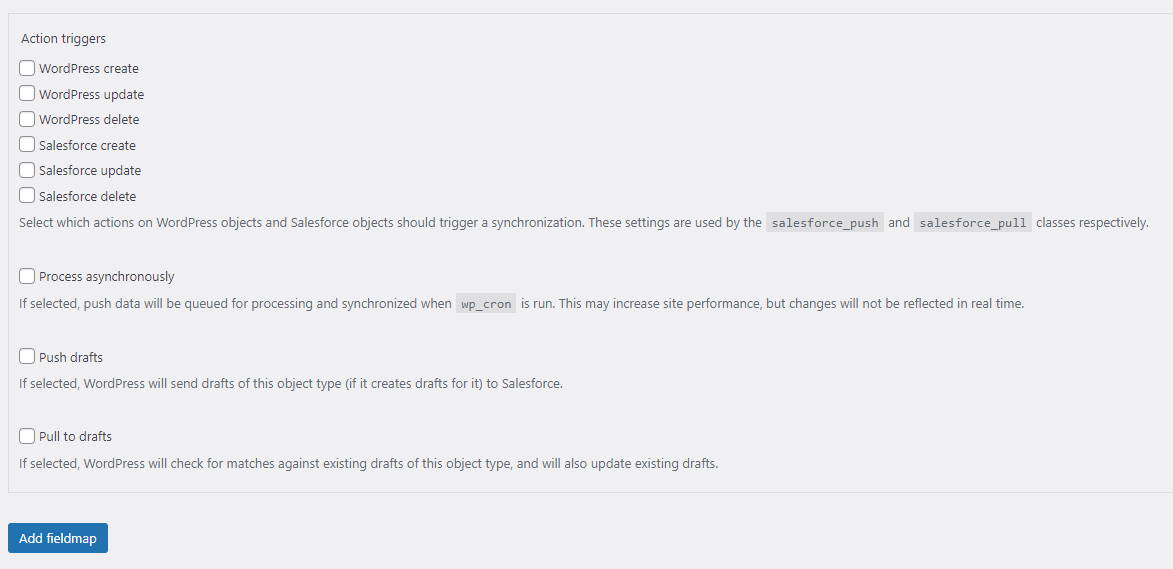
Step 4: Configure Which Actions Trigger an Update
With all of your field maps created, the hard work is done! All that’s left is to select a few more settings that determine which actions will trigger your connection. Under the “Action Triggers” setting, you will find checkboxes corresponding to actions on both the WordPress and Salesforce sides that will let you fine tune when data is sent between the two. Depending on how you want to manage the data, you may choose one, several, or all of the options.
The last three settings are optional, and all include descriptions that will let you determine whether or not you want to use them. Once you’ve finished making your selections, you can click the “Add Fieldmap” button at the bottom of the screen to save your connection.
Depending on which settings you chose for your field map directions and triggers, you can run a test to make sure your connection is working. Updates on the WordPress side should trigger the connection to fire immediately (again, depending on your settings). However, Salesforce updates don’t directly trigger the connection to fire; the plugin performs a check at a set interval to monitor changes to Salesforce, and if those changes meet the criteria for you connection, then the connection will fire accordingly. You can adjust how often the plugin checks Salesforce in the Scheduling tab.
And that’s it! While that may not have seemed like the simplest process to you, the reality is that before this plugin existed, building a similar connection would have been a very expensive process limited only to developers capable of working with the Salesforce API. The Object Sync for Salesforce plugin goes beyond a single-use solution and provides an entire framework for building robust connections between these two platforms, and enables creating Salesforce WordPress integrations for a much larger portion of the public.
Still, it may be a bit naïve for us to say that this plugin makes building these connections “easy.” As a group of web developers, a lot of the knowledge we take for granted isn’t necessarily a given for all WordPress website owners. If you’re having trouble with any part of this process, don’t be afraid to reach out to us; we’re always ready and waiting to help!